To translate and subtitle your own video, you have to go through five phases: transcribing what is said, timing each sentence, translating those sentences, adjusting them so they can be read, and publishing them as a separate track or embedded in the image. Automatic tools do the first three in minutes; the last two are what separate subtitles that read well from those the viewer ends up turning off.
This guide is for anyone who has recorded something and wants people who speak another language to understand it: a YouTube video, a Reel, a class, a talk, or a company presentation video. If what you want is to understand someone else’s video, you have another guide on how to translate YouTube subtitles as a viewer. The data from YouTube and Netflix comes from their official help pages, consulted in October 2026, and the tools we mention are the ones that dominated Google when we searched for this topic that same month.
In short
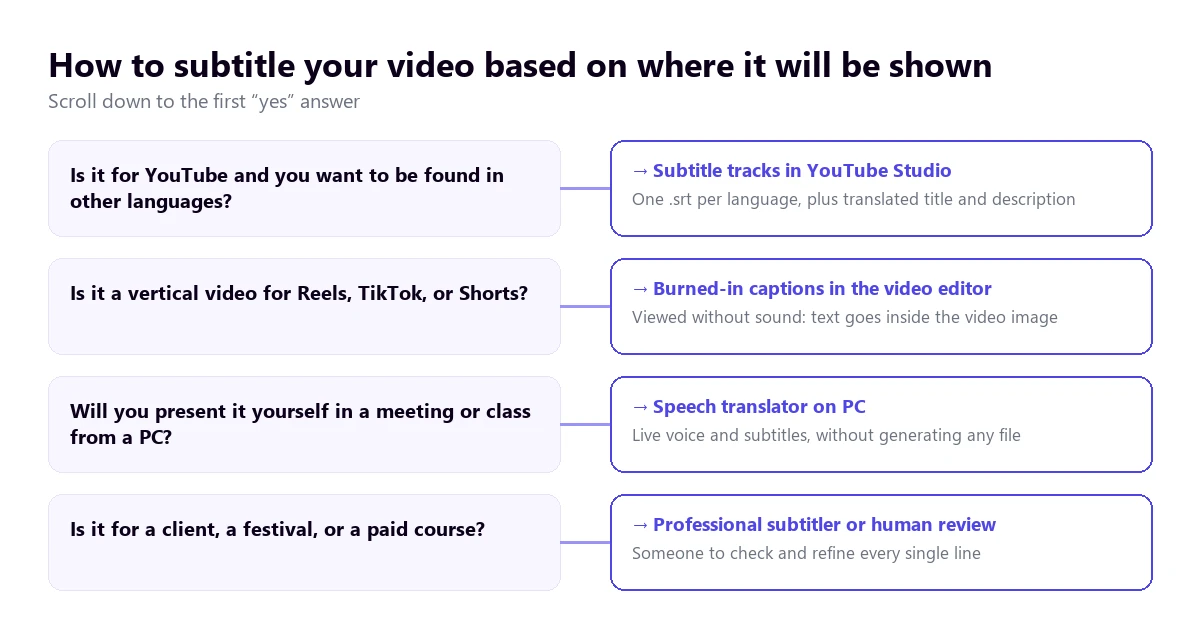
- You are going to show it yourself from your PC or you just need to understand raw footage: a voice translator on your computer does it without creating files (method 1).
- The video is going to YouTube: automatic subtitles, review, and one track per language in YouTube Studio (method 2).
- You want a free .srt file without uploading the video: Subtitle Edit with Whisper on your computer (method 3).
- It’s a vertical video for social media: an editor that embeds the text into the image (method 4).
- It’s for a client, a festival, or a paid course: human review (method 5).
In this article
- What is behind translated subtitles
- Separate track, embedded text, or dubbing: decide before starting
- The five methods, at a glance
- 1. If you are going to show it yourself: a voice translator on your PC
- 2. In YouTube Studio: one subtitle track per language
- 3. Free and on your computer: Subtitle Edit with Whisper
- 4. For Reels, TikTok, and Shorts: editors that embed the text
- 5. When the video is at stake: a professional subtitler
- What gets lost when passing subtitles to another language
- How to get subtitles that read themselves
- More questions about translating and subtitling a video
- So, which one do we use?
What is behind translated subtitles
A subtitle file is much simpler than it seems. An .srt, the most widespread format, is a text file with numbered blocks: a number, a line with the start and end time, and one or two lines of text. It can be opened with Notepad. All subtitle programs do is create, correct, and translate those blocks.
The first phase is transcription: writing down what is said in the original language. Today, this is almost always done by speech recognition, and it is highly accurate with a good microphone and a single person speaking. The second is synchronization: deciding in which millisecond each sentence appears and disappears. Recognizers do this at the same time they transcribe, but they cut where they detect a pause, not where an idea ends.
The third phase is translation, and here lies the main trap. It translates subtitle by subtitle, keeping the original times. If a block cuts a sentence in half, the automatic translator receives half a sentence and translates it poorly, because in English the word order does not match that of Spanish or German. The fourth phase, adjustment, consists of shortening and redistributing the text so there is time to read it. The fifth is publishing.
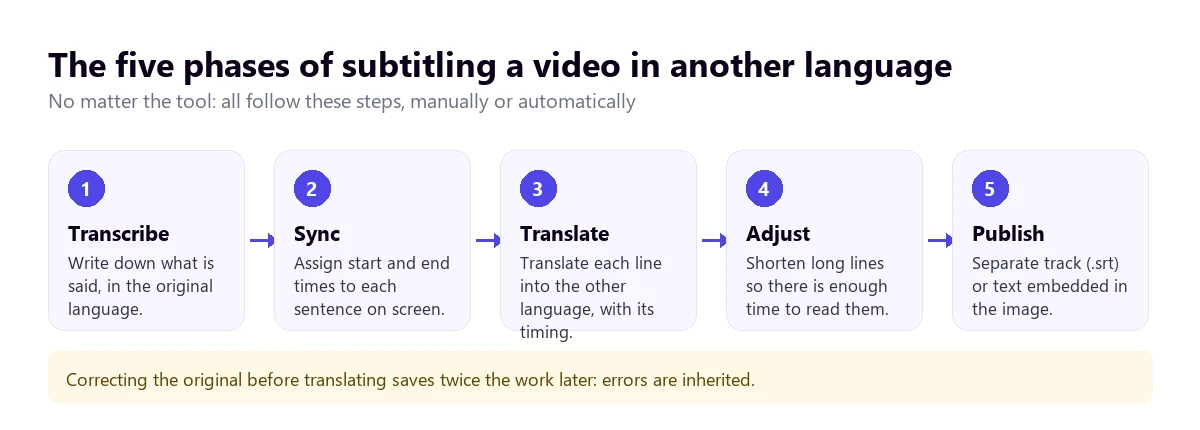
That is why, when translating and subtitling a video, the order matters. Correcting the transcription before translating is what saves the most time: a misspelled proper name in the original will be wrong in every language you translate it to, and you will have to fix it as many times as there are translations.
Separate track, embedded text, or dubbing: decide before starting
Before translating and subtitling a video, the question you should ask yourself, without opening any program yet, is how the text will reach the viewer. There are three answers, and each changes the workflow.
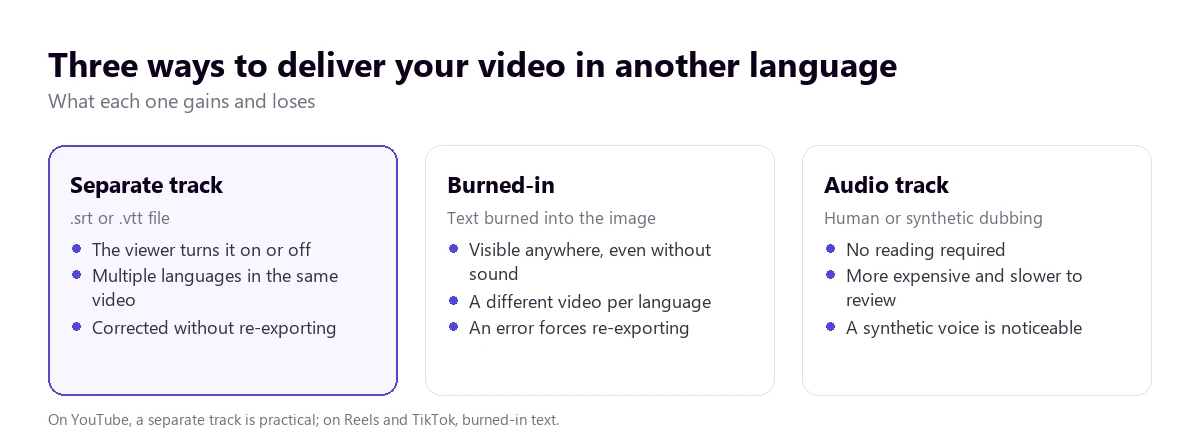
The separate track is a file that travels alongside the video and that the viewer turns on or off. It is what YouTube, Vimeo, course platforms, and players like VLC use. It has two big advantages: you can offer several languages in the same video, and you can correct a typo without exporting anything again. Its drawback is that it depends on the player: if the video is downloaded and forwarded via messaging apps, the subtitles get left behind.
Embedded subtitles, also called burned-in subtitles, are part of the image. They can be seen anywhere and do not depend on anything, which is why they are the norm on Reels, TikTok, and Shorts, where many people watch videos without sound. In exchange, each language is a different video, and an error forces you to export again and re-upload it.
Dubbing replaces or accompanies the voice with another audio track. It is the most comfortable for the viewer and the most expensive to do well. YouTube has automatic dubbing for creators who meet the requirements, but its help page warns that these dubs cannot be edited and fail with proper names, expressions, and slang. With synthetic voices, moreover, the tone is noticeable.
Regarding formats, YouTube’s help recommends starting with SubRip (.srt) or SubViewer (.sbv) if you have never made subtitles, because they only contain times and text and can be edited with any plain text editor. It asks to save them in UTF-8, which matters in languages like Spanish because of accents and tildes: an .srt saved with another encoding shows “canción” instead of “canción”. If you need to place the text in another position on the screen, for example to avoid covering a graphic, YouTube supports WebVTT (.vtt) with position information, although its own help describes it as an initial implementation.
The five methods, at a glance
| Method | What you get | Do you upload the video? | Your work | Cost |
|---|---|---|---|---|
| Voice translator on PC | Translated subtitles and voice while playing; no file | No; the sound is translated on the fly | None | 15 free min per day; paid plans |
| YouTube Studio | Subtitle tracks per language, translated title and description | Yes, to YouTube | Review the automatic ones and translate or upload each language | Free |
| Subtitle Edit with Whisper | .srt files on your drive | No | Install, review, and translate | Free |
| Editors with automatic subtitles | Video with embedded text and, sometimes, .srt | Yes, to their server | Review and style | Free plan with limits or subscription |
| Professional subtitler | Subtitles reviewed by a person | You hand it over | Order it and review | Per minute of video |
1. If you are going to show it yourself: a voice translator on your PC
Not all of your own videos need a subtitle file. If you are going to play the video yourself from your computer, in a projected class, in a session with a foreign supplier, or at a trade show with a screen connected to your laptop, you can skip the five phases: a voice translator listens to the player and shows the translation on the screen while it plays.
There is another case that creators know well: raw footage in a language you do not master. An interview recorded in Portuguese, statements from a German client, or a testimony in French that you have to cut. Before paying for a full transcription, it is useful to know which parts are useful, and for that, seeing it translated once is enough.
Traducore is a Windows 10 and 11 program that does this. In Windows 11, it captures the audio of the application you choose, for example VLC or the Windows player, without mixing notifications or music from other windows. It shows a subtitle bar on top of the screen, can read the translation out loud, and leaves the original voice underneath, at 65% by default, so the speaker can still be heard. It translates into 78 languages and detects the source language.
Step by step
- Load your video in your usual player and wait on the first frame.
- In the program, choose the Video / talk mode and select the player as the audio source.
- Choose the target language and, if you want, set the source language.
- Tick subtitles, voice, or both, and press start.
- Resume the video and let the translation follow it.
What you should know
The translation arrives with a three to six-second delay, because the program waits to have a full sentence before translating it. For a presentation, it does not get in the way; to show a tutorial with a lot of on-screen text, it is better to pause occasionally. It does not save the audio or the text, and it does not create any .srt: if what you need is a file to publish, continue with methods 2 to 5. The free voice is available in English, Spanish, French, German, Italian, and Portuguese; in the other languages, the free plan gives subtitles. That plan is 15 minutes a day, with no card and no expiration, and the paid plans are on the pricing page. It only works on Windows.
Show your video in another language without preparing subtitles
Open it in your player and show it with translated subtitles and voice, directly from your PC. 15 free minutes every day, no card required.
2. In YouTube Studio: one subtitle track per language
If the video is going to a YouTube channel, the platform does a good part of the work. As soon as you upload a video, YouTube tries to generate automatic subtitles by speech recognition in the video’s default language. Its help warns that they can take time, because the processing time depends on the complexity of the audio, and asks you to always review them: “You should always review them and correct any parts that haven’t been transcribed properly.”
Add or correct the original language subtitles
- Go into YouTube Studio and, in the left menu, select “Subtitles”.
- Choose the video. If you haven’t assigned a language to it, Studio will ask you before continuing.
- To correct the automatic ones, use the “More” menu next to that track and edit the text.
- To add your own, click “Add language” and, under “Subtitles”, “Add”.
When you click “Add”, three options appear. “Upload file” loads an .srt or any other supported format, with its times. “Auto-sync” receives only the text, without times, and YouTube calculates when each sentence goes; the help does not recommend it for videos over an hour long or with poor audio quality. “Type manually” lets you type while the video plays, with shortcuts to pause and to add a new subtitle.
Add other languages
Each translation is one more language on the same screen: “Add language”, choose, for example, Spanish, and upload the translated .srt or type it. In that same row is the “Title & description” section, which you should also translate. According to the help, YouTube shows each viewer the title and description in their language, and that helps the video appear in searches by people who do not speak yours. It is the step that most channels skip, and the one that brings the most views from abroad.
For the viewer, YouTube also offers “Auto-translate” in the subtitles menu, which translates your subtitles into another language on the fly. It is useful as a safety net, but you do not control that translation; if a language matters to you, upload your own track. If someone writes to you because that option does not appear, the most common cause is that the video has no track to translate, as we explain in the YouTube subtitles guide.
Automatic dubbing is the third piece. YouTube’s help says it is enabled by default for creators who meet the requirements, that it is disabled in “Settings” › “Channel” › “Advanced settings”, and that you can review the dubs before publishing them, but not edit them. For example, from Spanish it only dubs into Arabic, English, and Portuguese, according to its language table consulted in September 2026, and it does not support videos over 120 minutes or those that are almost entirely music.
3. Free and on your computer: Subtitle Edit with Whisper
If you want to have your .srt files on your drive, reuse them on other platforms, or not upload the video to any service to transcribe it, the most widespread combination on Windows is Subtitle Edit, a free and open-source editor that can use Whisper, OpenAI’s free speech recognizer, to transcribe inside your computer. In the guide on how to translate a video without uploading it to any website, we explain how to set it up and what model size to choose depending on your PC.
For a creator, the value of a subtitle editor is not the transcription, which any tool already does, but the control of time. Subtitle Edit shows the audio waveform below the video, and there you can see where each sentence begins and ends. Dragging the edge of a subtitle to the actual start of the voice is what makes the text look “glued” to the speaker.
The workflow that has worked best for us with our own videos is this: transcribe in the original language, correct and split the sentences in the editor, save that .srt as a master copy, and only then, translate. This way, each new language starts with good timing. If you translate with an online service from the editor itself, keep in mind that the text does leave the computer, even if the video does not.
And what if you want to embed the result? With the .srt done, ffmpeg, the command-line tool used internally by almost all video editors, burns it into the image with a single command: ffmpeg -i video.mp4 -vf subtitles=video.en.srt video-en.mp4. The new file already has the text inside and can be uploaded to any network.
4. For Reels, TikTok, and Shorts: editors that embed the text
In vertical video, the separate track is barely useful: the text has to go on the image, with large letters and in the lower half, away from the app’s buttons. That is what the editors with automatic subtitles that appear at the top of Google are for: CapCut, Canva, Flixier, VEED, or Happy Scribe, among others, in the October 2026 search.
They all follow the same pattern: you upload the video, the editor generates the subtitles, you review them in a list of sentences, choose the style, and export a new video. Some translate the subtitles into other languages, and some also export the .srt. We have not compared their prices or limits, so we do not quote them; before choosing one, check three things on their website: if the free plan leaves a watermark, if it limits the video duration, and if it allows you to download the .srt, which is what lets you reuse the work elsewhere.
A tip specific to this format: few words per screen. Social media subtitles work better with two to five words at a time than with full sentences, because the eye reads them at a glance while looking at the image. When translating, that rule is easily broken, because translating into languages like Spanish lengthens English sentences; review the translated blocks and split them again. If you also want your audience to understand other people’s videos on Instagram, we have a guide on how to translate an Instagram or TikTok video.
5. When the video is at stake: a professional subtitler
A video for a client, a short film going to a festival, a course being sold, or a brand campaign should not go out with unreviewed subtitles. A professional subtitler does not just translate: they condense, deciding what can be removed without losing anything, adjust the times to shot changes, translate important on-screen text, and follow a style guide.
Those guides exist and can be consulted. Netflix’s guide for Latin American Spanish, for example, sets a maximum of 42 characters per line and two lines per subtitle, and a reading speed of up to 17 characters per second in adult programs and 13 in children’s ones. It asks to split lines after a punctuation mark or before a conjunction or preposition, and never to separate a noun from its article or a first name from a last name.
A reasonable middle ground, if the budget does not allow for a professional, is to have the machine translate and a person review who knows the target language and the video’s topic. Reviewing an already translated .srt is much faster than translating it from scratch, and it catches the most noticeable errors.
What gets lost when passing subtitles to another language
There are errors that repeat in almost all automatic subtitle translations, and you should look for them on purpose when reviewing.
Split sentences. We already saw it in the phases: if a block ends mid-sentence, the translator receives a chunk without a verb or without an object and resolves it as best it can. The symptom is a translated subtitle that is not understood on its own, even if it makes sense when joined with the next one.
Length. Translations into languages like Spanish usually come out longer than the English original, and the times are the same. The result is subtitles that disappear before there is time to read them. With the limit of 17 characters per second, a two-second subtitle allows about 34 characters: little more than half a line.
Address and register. An automatic translation decides on its own whether the narrator uses formal or informal address (like “tú” or “usted” in Spanish), and sometimes changes its criteria between one block and another. In a video for Latin America, moreover, the “vosotros” used in Spain sounds strange. Decide the register beforehand and search for it throughout the file.
What is not said. Graphics, presentation slide text, and on-screen messages are not in the transcription, so no tool translates them. If the video explains something with a chart, manually add a subtitle with what it says.
Product names and industry jargon. A speech recognizer writes a brand or a technical term as it sounds, and the translation turns it into something else. A list with the terms from your video, reviewed before translating, avoids most of these mistakes.
How to get subtitles that read themselves
- Record with subtitles in mind. Short sentences, clear pauses between ideas, and only one speaker at a time make the transcription come out almost clean.
- One idea per subtitle. If a block contains the end of one sentence and the beginning of another, separate it, even if it ends up shorter.
- Two lines maximum, and better balanced: a slightly shorter top line over a bottom line reads better than a very long one over a single word.
- Let the subtitle enter with the voice, not before, and do not let it stay on screen after a shot change.
- Remove filler words and repetitions. “Well, so, as I was saying” adds nothing in writing and steals reading time.
- Review while watching the video, not reading the file. A correct subtitle in the text can be unreadable at real speed.
More questions about translating and subtitling a video
How can I add subtitles to a video?
With a tool that generates them from the audio and lets you correct them: YouTube Studio if the video is going to your channel, an editor like Subtitle Edit if you want the file on your computer, or a video editor with automatic subtitles if you want them embedded. In all cases, the part that cannot be skipped is reviewing the text before publishing it.
Why doesn’t YouTube translate the English subtitles?
Almost always because the video has no subtitle track to start from: automatic translation needs a text to translate. From the creator’s side, the solution is to check in YouTube Studio that the video has its subtitles in the original language or, even better, to directly upload an English track. The guide on how to translate a YouTube video covers the rest of the causes from the viewer’s side.
How to make a Reel with subtitles?
TikTok generates automatic subtitles within the app, and Instagram can dub the voice with Meta AI if the creator enables it when publishing, but to translate the subtitles or style them, the usual thing is to prepare the video in an editor that embeds them, review them, and upload the finished result. Use large letters, few words per screen, and leave the bottom band free, where the app places its buttons and the post text.
What is a subtitled video?
A video that shows in writing what is being said, synchronized with the voice. It can be in the same language as the video, for those who cannot hear it or watch it without sound, or translated into another language. Subtitles for the deaf and hard of hearing also add sound information, such as music or a doorbell, and indicate who is speaking.
So, which one do we use?
For our own videos, it depends on the destination. The ones going to YouTube are subtitled with a master .srt made in the editor, reviewed in the original language and translated later, and we upload it as a separate track along with the translated title and description. The clips for social media come from that same .srt, split into shorter blocks and embedded. And when we are going to show the video ourselves from our laptop, or we receive recorded material in a language we do not master, we do not prepare anything: we open it in the player and follow it translated with our program. If you have to transcribe a long recording to use it as a document, the guide on how to transcribe audio to text and translate it covers that case.
Your video, understood in another language from the first minute
Translated subtitles and voice over any Windows player, without preparing files. Create your account and use 15 free minutes every day.